Week of May 25, 2020
Safari Animal Shadow Drawing
Watch and listen!
What you will need:
- Three pieces of colored paper, one red, one orange and one yellow for sunset- sunset colors could be any combination like a blue, yellow and purple.
- glue
- your any animal toys
- pencil and eraser
- Black paint
- small brush
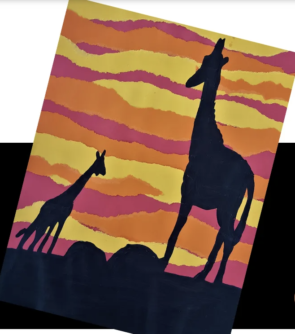
Let’s make a sunset background with colored papers!
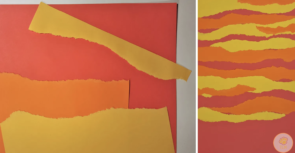
- Take three pieces of colored paper, one red, one orange and one yellow.
- Tear strips paper from the yellow and orange paper.
- Glue them onto the red – alternate the colors but you can do whatever your sunset looks like, more yellow at the top or tearing larger or smaller strips.
- YOU’RE DONE FOR THE SUSET BACKGROUND!
Place your safari animals out!
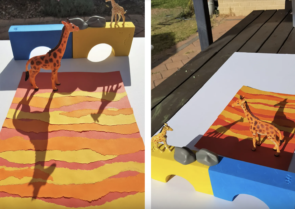
- Place your safari animal against the late afternoon sunset. Just imagine the large ears of an elephant or the antlers of an antelope against this sunset.
- Play with different heights and angles – take the angle of the sun into consideration because it distorts the shadows of your animals.
- Take a pen or pencil and trace the shadow outlines when everything is arranged the way you want it to be.
- Paint the shapes in with black paint.
- Ta-da! You are all done!
source:taminglittlemonsters.com
Week of May 18, 2020
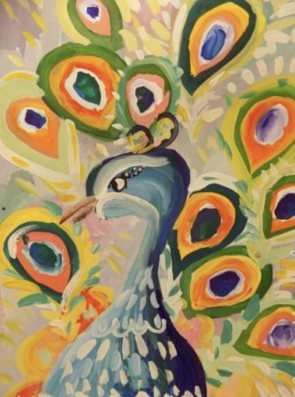
Summer Peacock!
Let’s draw and color a peacock to celebrate summer!
Watch and listen carefully to the fun videos down below!
What you’ll need:
- Paper ( watercolor paper, construction paper, cardboard)
- Any types of paints at home
- Oil pastel
- Markers
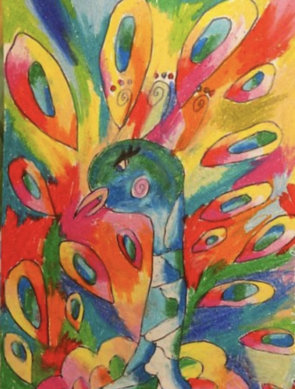
Sketching your peacock
- First, sketch the peacock with a pencil.
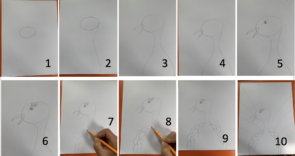
- Draw an oval the size of your fist onto the center of the paper.
- Make a long, curved line from the right of the circle to be the neck.
- Add another curved line to the left side to finish the neck, from the circle to the bottom. Make a small “boomerang” shape on the left side of the circle, above the neck.
- Finish the “boomerang”. This is now the beak.
- Now, near the top along the center of the head, make a big eye.
- Remember, peacocks have long, curved eyelashes. Let’s add some!
- Now let’s start the tail feathers. Starting from the bottom of the body and neck, start making half-circles that overlap each other. Think of the circles as scales on a fish. Do the same for both sides.
- Now, add straight lines from the half-circles along the body that go across the paper, like rays of sunshine. Draw some circles along the lines, to make the “eyes” of the feathers.
Your sketch is all finished!
Let’s color your peacock!
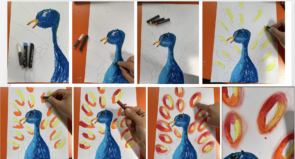
- Grab your oil pastel and choose a two groups of color: one WARM and one COLD. You can choose which color group you want to use for the body and the other for the feathers. In the example, Miss Kay used blueish-group colors for her peacock’s body.
- Now, use a bright color for the beak, and finish up the body of the peacock with the colors you chose.
- If you want, mix up the colors some more. Maybe a lighter color for the tummy and head.
- Let’s color the eyes! Use a darker color to color the lashes and the eye.
- Now, use the OTHER color group you chose for the tail feathers (warm if you used cold colors for the body, cold if you used warm colors for the body). Use the lightest color from the group you have, and color ONLY ONE side of each feather.
- Now, use a darker color and fill in THE OTHER side with that color.
- If you want, you can add darker colors to make more layers. Miss Kay used red on her feathers too!
- Again, if you want to, use your finger to SMUDGE the feathers.
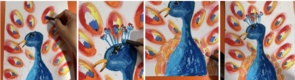
We’re done coloring! Now, let’s add a background.
Coloring the background
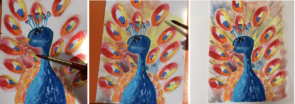
Oil does not mix with water. So, you can paint with watercolors over the oil and they won’t mix or smear! Let’s use watercolors to paint a beautiful background behind our peacock!
Week of May 11, 2020
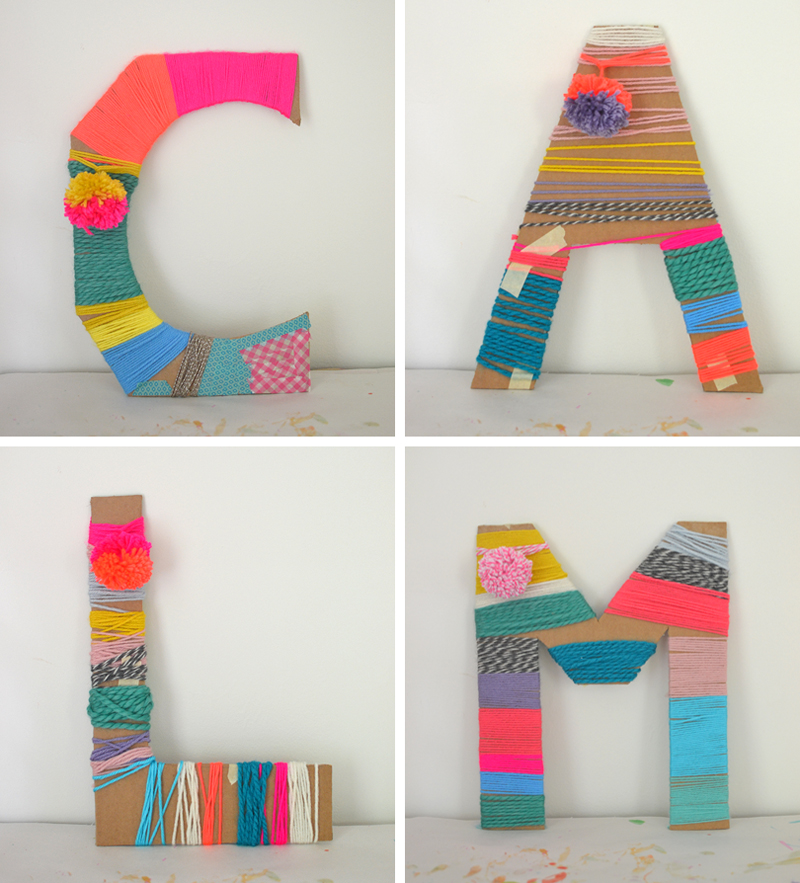
Cardboard Letters
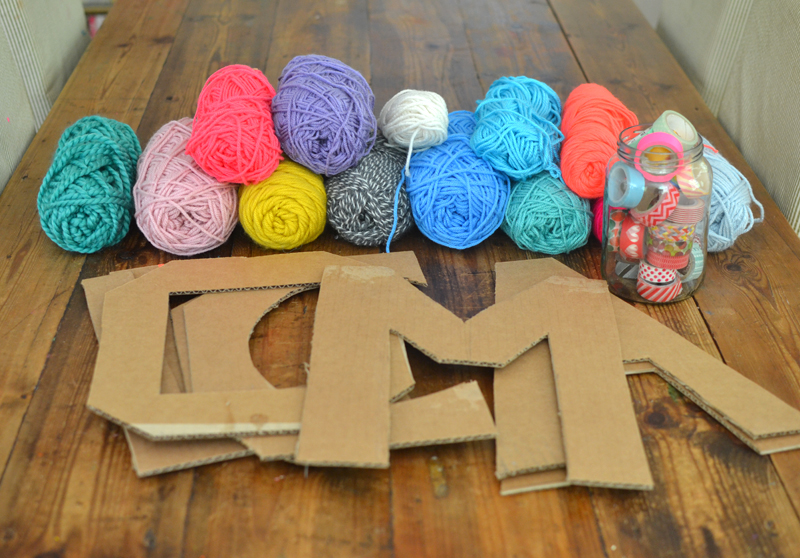
Students can reuse any type of thick paper (ideally cardboard) to make the letter frames standing for the student’s initials. Take some yarn to wrap around the letter to make color messages or pattern. Students should come up a list of positive words that start with the same letter (for example, “C”- courage, calm, collective, cool, etc.). The size of each letter must be bigger than regular letter paper.
What you’ll need:
- Cardboard or Thick paper (Parents can draw the first letter of each child’s name)
- Scissors, or an Xacto knife (for cutting cardboard) – for parents ONLY
- Any type of Yarn (if you don’t have yarn, cut colorful strips of paper to glue on instead)
- Tape ( masking tape and clear tape)
- A plate (optional, but helps with general tidiness)
- Pom-poms, Markers, or any decorative craft materials (optional, but kids can add final texture on the yarned letters)
Make and Display
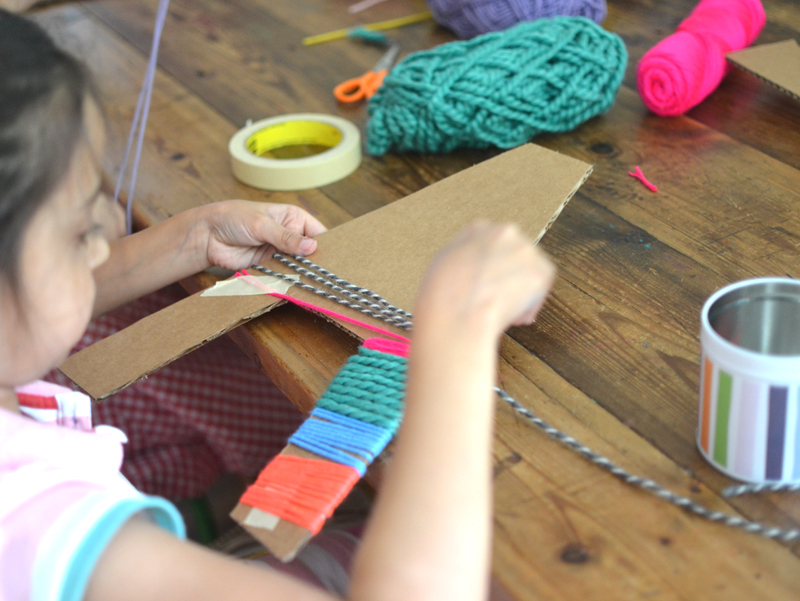
- Pick a color of yarn, cut off a long piece, and tape it to the back. Then wrap. When finished, tape the end of the string to the back so you can only see the layer of color yarn. If you don’t have yarn, then student can make paper strips to glue on.
- Try to wrap the yarn laying flat on the cardboard.
- Feel free to make the letters look unique. Students are free to interpret their project any way they please.
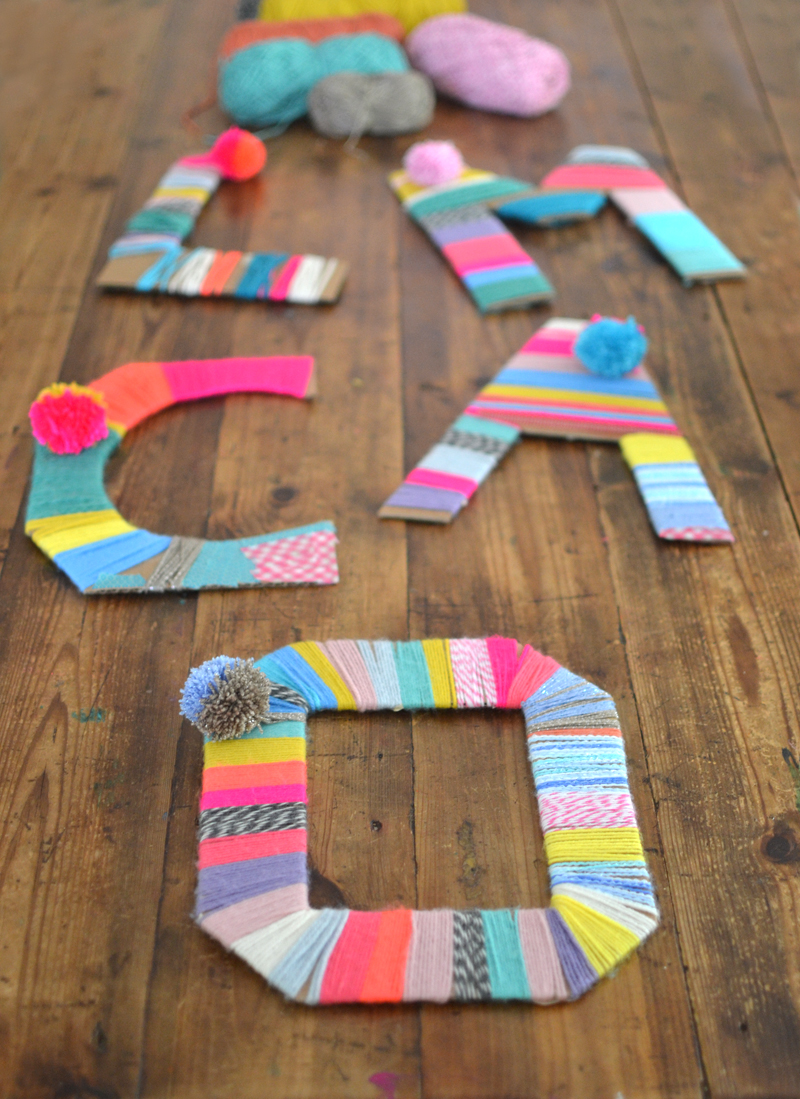
source: www.artbarblog.com
Week of May 4, 2020
for mom: Let’s make op art hearts for mother’s day!
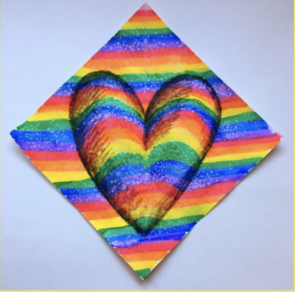
Use lines, zig-zags and spots to make a heart which makes your eyes go funny!
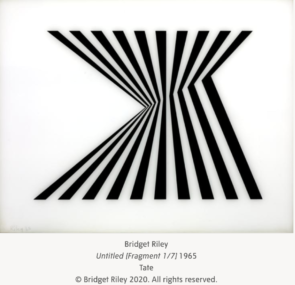
What is Op Art?
Bridget Riley is a British painter. The style of her painting is called op art. Op art is short for ‘optical art’. Bridget puts colors, shapes and patterns together in clever ways to create an optical illusion. This can make an image look like its moving!
Here are some of her op art paintings …


What you will need:
- Paper
- Markers
- Black Crayon
- Pencil
- Cup of Water
- Paintbrush
- Table salt
- Bring the side to the bottom and fold
- Draw along that vertical line and then cut
- Place the perfect square in diamond position
- Draw the half heart shape in large enough to fill the half space
- Fold and rub it together to print one half of the heart shape onto the other side.
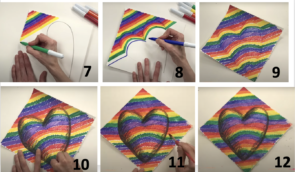
- Add some colors by using markers (I used rainbow colors, but you can use any color you want).
- When your colored line meets the heart shape, make sure your marker “hops” over the heart!
- Repeat for all of the other colors you want.
- Now, you should be able to see a heart made of colors.
- Using a black oil pastel, outline the heart shape that you see. If you want, try shading in the edges so that the heart pops out.
- Take a brush to spread water across the surface, and sprinkle some salt over your art and let it dry!
- Tada! You made art that’s full of love for your mom!
source:https://cassiestephens.blogspot.com/
Week of April 27th
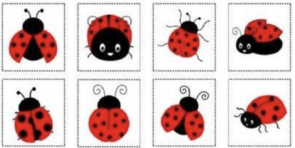
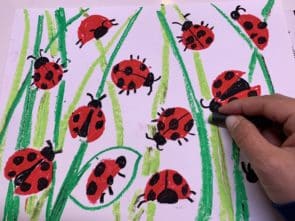
Let’s make playful ladybugs from the story ‘The Grouch Ladybug‘ by Eric Carle.
Watch and Listen
What you need:
- White drawing paper
- Oil pastels
- Pencil (for practicing how to draw a ladybug)
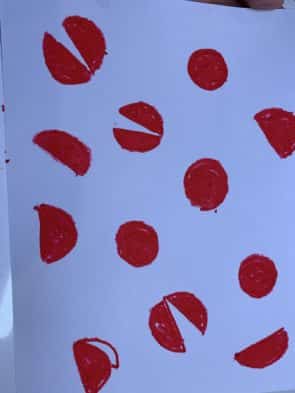
Let’s look at our cute ladybug!
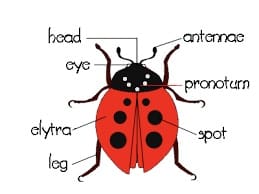
- Want to know how to draw a simple ladybug?
Draw and Color!
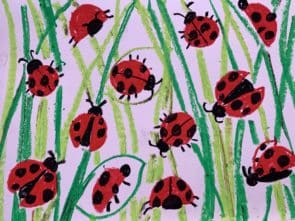
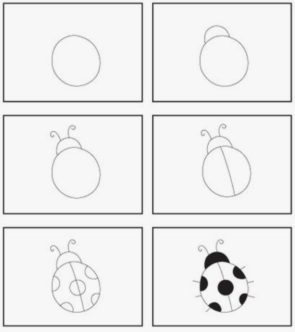
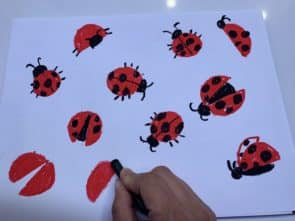
- First, draw different ladybug shapes and fill the entire paper with RED oil pastel.
- Then, add some details (spots, head, legs, and antennae) of the ladybugs with BLACK oil pastel.
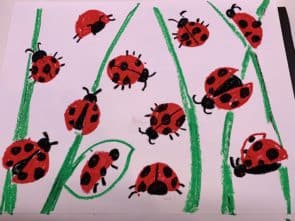
- Now, create a habitat for the ladybugs by using greenish oil pastels. Make sure that ladybugs are close to you. Be creative! You can build your own habitat for your ladybugs.
 .
. 
- Tada!
Week of April 20th
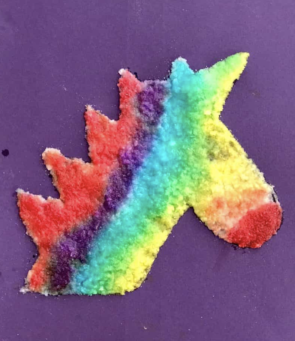
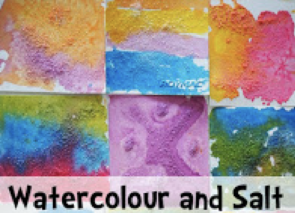
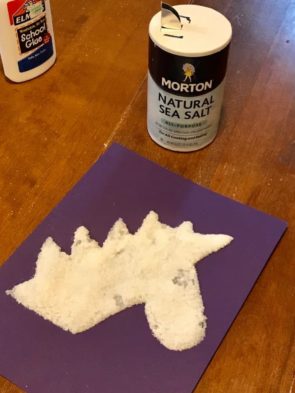
This week, our young artists will make a painting with salt and glue. It is very simple and fun with only 3 ingredients. Students will learn a simple technique and love watching the colors travel across their painting.
 .
. 
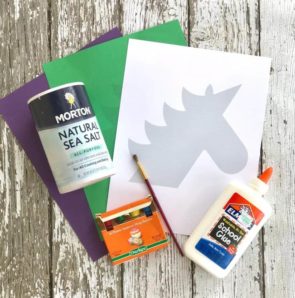
What you need:
- Watercolor paper / any thick board
- School Glue
- Watercolors (if you have food coloring, you are welcome to use it)
- Table salt
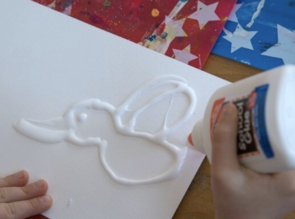
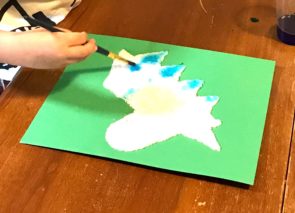
Draw, Cover, and Paint!
- Draw your very own favorite designs with glue on the paper/board. You can also print the templates below. Students can draw a unicorn, dinosaur, or a firetruck (silhouettes). Silhouettes are the shadows that outline an object in one color.
- Cover the lines of glue with salt, shaking off excess salt.
- Gently touch a wet paintbrush to the salt and watch the colors travel across the painting (You can use a pipette instead of a paint brush).
Printable templates:
source: https://sweettmakesthree.com/watercolor-salt-painting-unicorn-craft-for-kids/
Week of March 30th
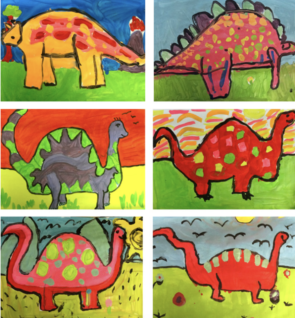
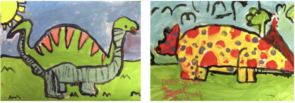
This week, students will get information about dinosaurs from the linked video below, Dinosaurs 101 / National Geographic and sketch their own favorite dinosaur with a pencil. Let’s emphasize the dinosaur’s texture! is it rough? How can you describe it? Pointy, round, or zigzag? Color with any materials that you have at home (The examples above are done with tempera paint).
If students are looking for different materials instead of paint, students can use mixed mediums such as oil pastels or markers (for the dinosaur) and old magazines (for background) just like Matisse did on his paper cut and paste.
watch and listen:
Draw a Dinosaur:
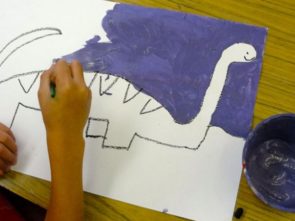
To draw the dinosaur, start with a backwards letter “C” on either the top (long neck) or bottom (Stegosaurus) of the paper, depending on the dinosaur. This is the head.
Next, draw a long neck for the Long Neck dinosaur. Be careful not to go too far down the page.
For the Long Neck, add a curved line for the body and the tail. Add the belly and the legs in the same way for the Stegosaurus.
Finally, draw a horizon line behind it. This is where the sky meets the earth.
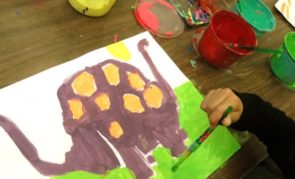
Paint and Outline
To paint the picture, set out tempera paint or squeeze paint.
Paint the dinosaurs first and then work on the background.
If students use dry medium (markers, pens, pencils) instead of wet medium for the dinosaur, outline the dinosaur with a black pen/pastel without coloring in the body. just work on its texture!
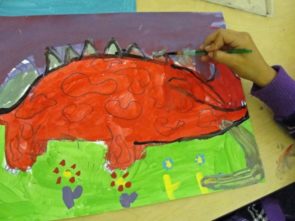
All done!
source:https://www.deepspacesparkle.com/
Week of March 23rd
Grades 2-3
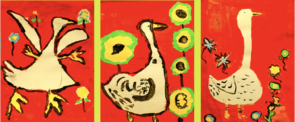
This week, students will incorporate literature into an art project. Students will watch the linked video below ‘Petunia’ and sketch a goose with pencil then paint with happy colors, just like the book. If kids finish early, have them paint the other animals Petunia meets.
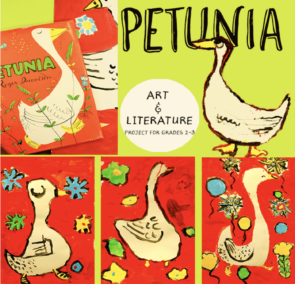
Watch and listen!
- Watch and listen to the story: Petunia by Roger Duvoisin
WHAT YOU’LL NEED:
- 12″ x 18″ white sulphite paper (students are welcome to use other sizes if such sizes are unavailable)
- Pencil and Eraser
- Red, yellow, white, blue, green and black tempera paint (students can also use dry mediums(oil pastel, marker, or color pen) instead).
- 1 medium tip round brush
- 1 small tip round brush (for outlining)
- Black marker, black crayon or black oil pastel as optional outing supplies.
DRAWING
After watching the video, students can practice drawing their own Petunia, by pausing the video to get their favorite Petunia picture. Parents can encourage them to make a dot near the top of the paper and one near the bottom. The dots provided guidelines for where to start the head and where to place the feet. This ensures the goose will be drawn large enough to fill most of the paper.
PAINTING
Once the drawing is complete, students will dip a medium paint brush in the red paint and painted sections of the background paper. Students will use the stroke-stroke technique that they learned in class to apply the paint evenly. They will carefully paint around Petunia and the spring flowers (think about what’s around Petunia and what the background should be).
After the background is complete, the students will paint flowers and leaves with a collection of green, yellow and blue paint mixed in with small amounts of white (make sure to dip the brush in white first!). This teaches students about tints, which is the process of making colors lighter.
OUTLINING
Once the paint is dry (from the 1st week), students can use a black oil pastel to outline Petunia. The white paper offers enough contrast so that painting the goose white will be unnecessary, and does not need to be filled white. Alternatively, though, students can paint their goose if they wish.
If you don’t like to use black pastel to outline, you can use a thick black marker or even a crayon. Experiment and see what medium works best for you.
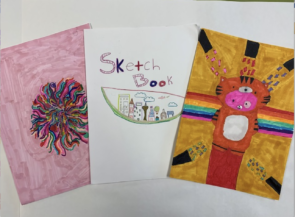
Weeks 1 & 2
Let’s make artful sketchbook to get you going!
When it comes to limited supplies, drawing is going to be the best way to have our students find success. They can simply draw with the materials they have, any type of mark-making and paper will do the trick.
1.Watch video :
Frida Kahlo and her animalitos by Monica Brown Illustrated by John Parra
2. Make the sketchbook To make this sketchbook, you only need white papers(at least 5 of them) and a stapler.
click this: Make artful sketchbooks
3. Decorate your sketchbook cover! Just like Frida, make you feel happy when you make your own masterpiece! On the cover of your sketchbook, it can be a drawing , painting , or collage. you can use any materials you have at home: a pencil, colored pencils, makers/pens, oil pastels/crayons, or watercolor paints/acrylics (MUST ASK YOUR PARENTS FOR USING THESE MESSY MEDIUMS). You can draw animals, color the sky, or make abstract!
Just be yourself like Frida!
Examples:
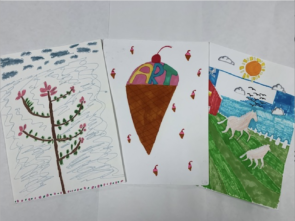
4. Finish the Picture! Let your kids’ imaginations soar with these exciting “Finish the Picture” prompts. Click the link below, you can either print or draw 5 prompts for them in their sketchbook. Let your kids get creative with their own story! They can make a title of their finished picture and write down their story on the back of picture.